BigML Bindings: Modeling and prediction process
After going through our Quick Start section that introduced some ML
resources
in BigML, you may still be left with a few questions,
such as:
how do I change my fields’ types?
how do I change my preferred fields?
how do I configure my model?
and even:
what am I doing exactly at each point of the code?
This document will try to bridge that gap by explaining how you can use different creation arguments or change some of the properties used by default to adapt your resources to your own requirements.
As general principles, let’s remember that each binding has its own syntax to build the REST API calls to BigML, so from this moment on we’ll use the common create and update words as placeholders for the corresponding methods in the binding of your choice. You’ll need to check each binding documentation to know the specific names for these methods.
Another thing to keep in mind is that resources in BigML are not totally mutable. They are mostly immutable, and once they are created there’s only a limited subset of attributes (like names, labels, descriptions, etc.) that can always be updated. Besides those common updatable properties, each type of resource has a different subset of properties that can also be updated. In this document we’ll guide you as to which are the most frequently used, but to learn about all of them and their allowed values you can always refer to the API Documentation descriptions of each resource type.
Finally, as resources in BigML are asynchronously created, when the bindings’ create and update methods make a request to the API the response will not usually be a resource in its final complete form. The API response will always include a resource ID and some status information which keeps track of the evolution of your request. As for the rest, the resource information will be growing and evolving until the final resource status is reached. Resources in BigML are created using *anytime algorithms* so that they can be useful at any step of their construction process. This also means that, to use the complete information of the resource, you will need to repeatedly poll for it using the bindings get method till the status reaches one of the two possible terminal states: finished or faulty. Usually, the bindings provide an auxiliary function who takes care of this iterative polling procedure. You will need to call it always after the create or update calls to ensure that a fully formed resource is available for the next step.
The detailed prediction workflow
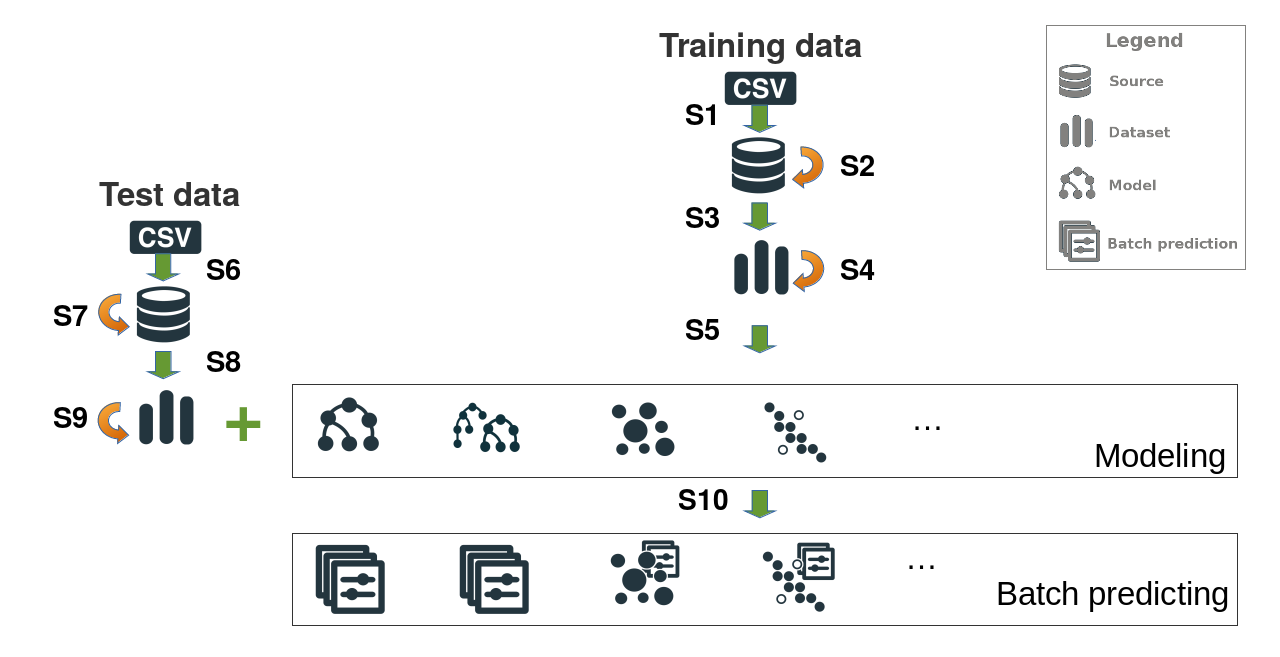
The process to create a model or to generate predictions in BigML goes through several steps. In each step, a new resource is generated or updated. Some are mandatory, others are optional. You can see a sketch of the process in the following image. Green arrows are creation steps that generate new resources from old ones, and orange arrows are update steps. The steps have been numbered from 1 to 10 and we’ll discuss them in some more detail.
Common pre-modeling steps (S1 - S4)
These are the steps that must be run to upload a file in BigML and get its contents ready for modeling, so whatever the task you want to do in BigML, you’ll probably need to follow them.
First step: uploading your data to create a Source
The first step (S1) is compulsory: Creating a Source by uploading your data.
This means that you’ll need to use the create source method in your favourite bindings to create a Source object. The only mandatory argument is the path to your data, and the rest of arguments that can be found in the API Documentation are optional.
The result of the create_source call includes a JSON describing the Source resource. All the resources in BigML can be identified using a unique resource ID. This identifier can be found in the resource attribute of the JSON response. The format of this ID for Sources would be source/ followed by an alphanumeric string (e.g.: source/4f603fe203ce89bb2d000000). The rest of properties are described in the properties section of the API Documentation.
Second step: updating your Source to change the inferred fields structure
This step (S2) is optional: Updating a Source.
In BigML, only the properties marked as updatable in the previously mentioned table of the API Documentation can be changed. For the Source, you can update the attributes that control how your data has been parsed, which are the strings to be interpreted as missing data, how will text or items handling be done and what fields types are to be assigned. Let us focus now in the fields property, which needs some further explanation.
The fields structure is inferred once you upload your data to BigML. This is reflected in the contents of the fields attribute, where you will see that an ID has been assigned to each of the detected fields to identify the field uniquely. Keyed by this ID, there’s a structure that contains all the field information, like its name, type, column number, etc. Its JSON would look like:
"fields": {
        "000000": {
            "column_number": 0,
            "name": "sepal length",
            "optype": "numeric",
            "order": 0
        },
        "000001": {
            "column_number": 1,
            "name": "label",
            "optype": "numeric",
            "order": 1
        }}
In the example, there’s two fields, sepal length and label which are both considered to be numeric. The type has been inferred from the contents of the first rows in your data, but let’s suppose the second one is not really a numeric field but a categorical one. In this case, we should need to change the field’s type and this could only be done by updating the Source object with the new information:
"fields":{
        "000001": {
            "optype": "categorical"
        }}
Mind that you’ll need to know the ID of the field you intend to change. Some bindings have utilities that will help you produce these IDs given the field names. As BigML let’s you use columns with duplicated names, using the ID is the only way to ensure that the change will be applied to the correct field.
In order to update a Source the only compulsory arguments are the source ID and the changes to be applied.
Third step: creating a Dataset to serialize the whole data
This step (S3) is compulsory: Creating a Dataset
This will be achieved by using the create dataset method of your bindings
and the only mandatory argument for this call is the Source ID which
points to the Source object we want to create the Dataset from. The
rest of arguments described in the
API Documentation
are optional. The response for the create dataset call contains also the
corresponding resource ID for the dataset
(e.g. dataset/4f603fe203ce89bb2d000004) amongs other properties,
described in the
datasets section of the API Documentation. The dataset
summarizes and serializes the entire set of values that each field contains.
This can cause some of the fields to be marked as non-preferred if
they are not expected to be useful for the model. For instance, a constant
field will be marked as non-preferred. This feature will be a new property
of the fields structure in the dataset JSON response. In order to change
the preferred flag and the rest of updatable properties you’ll need to go
to the next
step.
Fourth step: updating your Dataset to prepare modeling
This step (S4) is optional: Updating a Dataset
Here too, a small subset of properties can be updated (only the ones marked as such in the datasets section of the API Documentation. In particular, the Dataset has a fields attribute too. In this case, the fields value only allows to modify the preferred, label, name, and description attributes. This can be achieved using the update dataset function in your bindings.
Fifth step: creating your model
This step (S5) is compulsory: Creating a Model, Ensemble, Cluster or any of the ML modeling available resources.
The model can be created using the configuration options by default or customizing some values to improve its performance. The only mandatory argument for the create model call is the dataset ID to start from. The rest of arguments described in the API Documentation are optional. For instance, when building a classification model you might like to limit the number of nodes in your decision tree. Also, if the number of instances that belong to each class in your data is very skewed, you should consider balancing them. This can be achieved using a balance_objective argument, as explained in the API Documentation. Also, a major attribute to be taken into account when doing classification or regression is the objective_field, which chooses the field that will be predicted. Any of these properties cannot be updated. If you want to change them, you’ll need to create a new model with the new configuration.
Any other modeling resource (like clusters, anomaly detectors, etc.) will also have its particular configuration arguments (described in their corresponding API documentation section). Again, to use a different configuration you’ll need to create a new resource with it.
Preparing test data for predictions
When your model is ready and you want to create predictions for a new bunch of test data, you will need to run through the S1 - S4 previously described steps using your test data file. In the previous image, this process is labeled as S6 to S9. After this process, your test data will be stored in a new Dataset and ready for prediction.
Creating batch predictions
Once models and test datasets are ready, you can proceed to create the predictions using both.
Tenth step: creating batch predictions
This step (S10) is compulsory: Creating batch predictions
The batch predictions can be created using the create batch prediction method in your bindings. The mandatory arguments for the create batch prediction call are the ID of the model used to predict and the ID of the dataset that contains the test instances that you want to predict for. The rest of arguments described in the API Documentation are optional.
Feature engineering and composed workflows
These are the steps that you should follow to model and predict using BigML. Of course, this workflow can be more complex if you:
filter or extend your datasets to build new ones (feature engineering using flatline)
compose different workflows to achieve your ML solution
In both cases, you should run S1 - S4 to get a first Dataset and then add some more steps till you reach the Dataset you like.
If you are using feature engineering, you’ll call the create dataset having as mandatory argument the dataset ID that you start from and adding new fields to it with the transformations of your choice. This will generate a new Dataset and you’ll resume from S5 using it.
If you compose different workflows, the final picture will be some composition of sketches like the one enclosed. For instance, a Dataset generated in S10 can be used as origin for a different modeling task.
Solving your problem can also involve both feature engineering and workflow composition, so steps might grow in length and complexity, but in general their building blocks will be similar to the depicted sketch.